In this post, I will show you how to create an 802.1X WLAN using an Aruba Mobility Controller, ClearPass and Active Directory (AD) using the RADIUS protocol. I do a lot of consultancy work for private schools here in Australia so I will emulate a school network by authenticating students and staff members and applying
At the time that I started to write this
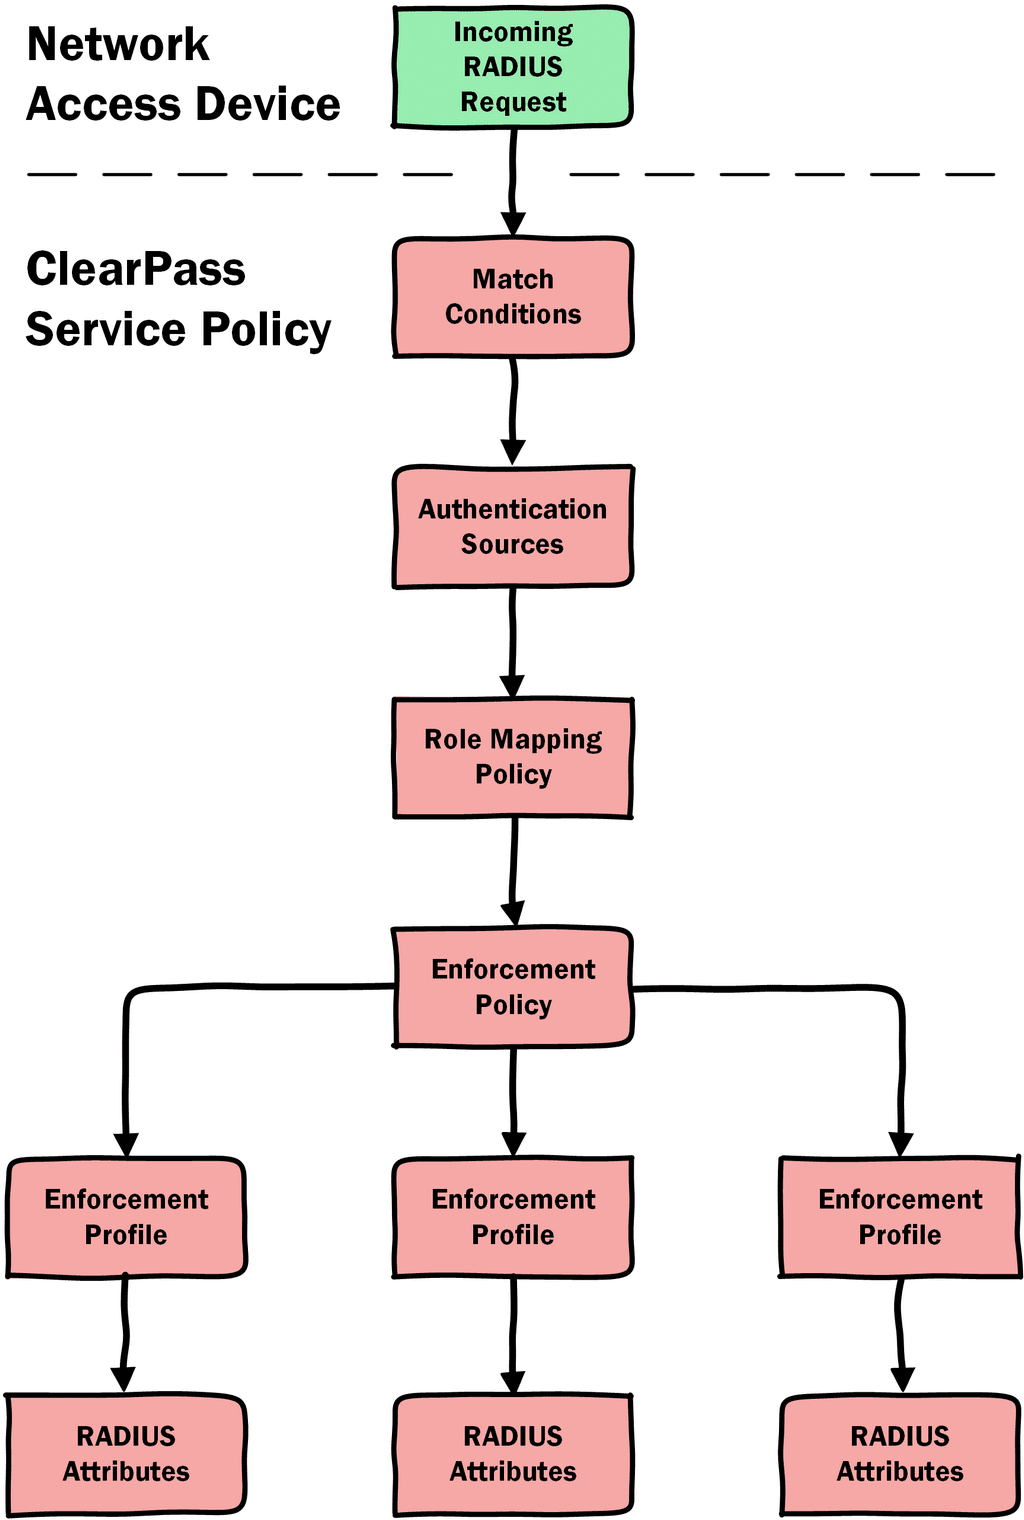
RADIUS Workflow
The RADIUS workflow for ClearPass can be a little confusing at first so I have created the image below in an attempt to simplify it for those just getting started. In this scenario the Network Access Device (NAD) is the Aruba Mobility Controller.
Controller Configuration
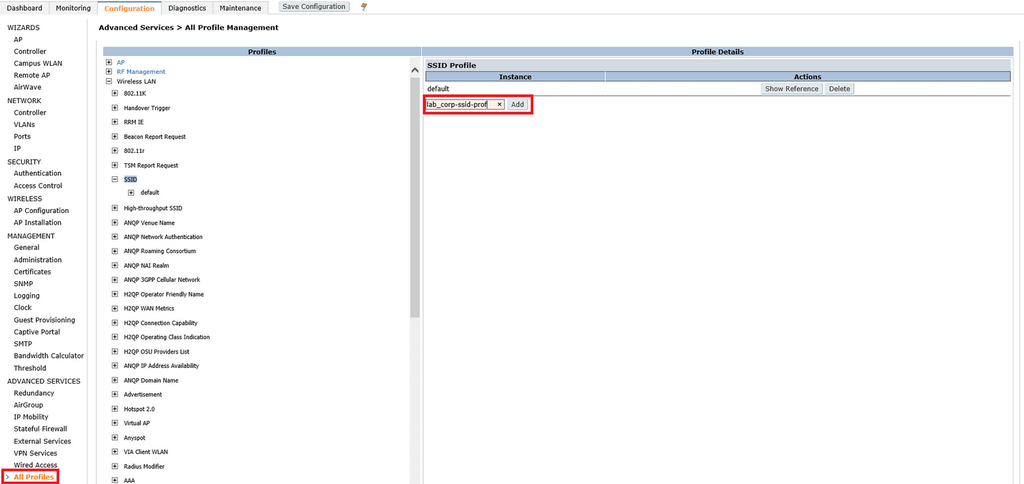
SSID Profile
The SSID Profile is where we define our SSID name, authentication and encryption methods. Click Configuration > All Profiles > Wireless LAN > SSID. In the text box type in the name of your new profile and click Add.
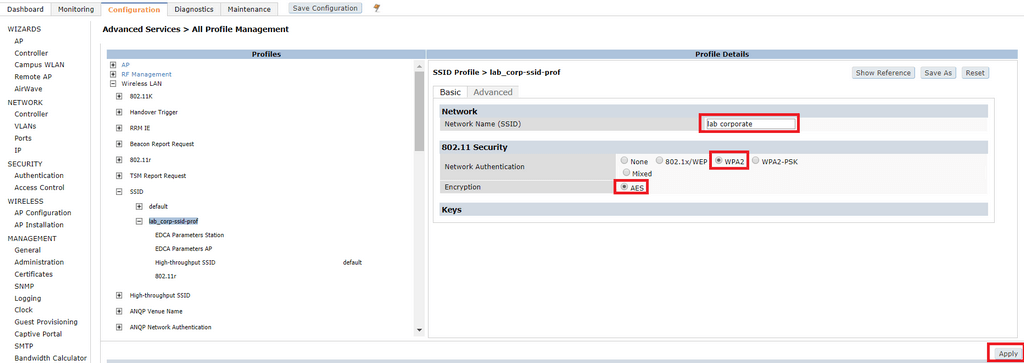
To allow 802.1X authentication on your WLAN, you simply need to select WPA2 as the network authentication method. Don’t be fooled by the 802.1x/WEP option, this is not typically used in enterprise networks. We want to use AES as the encryption method; if you see multiple options here ensure you that you have selected AES.
RADIUS Server
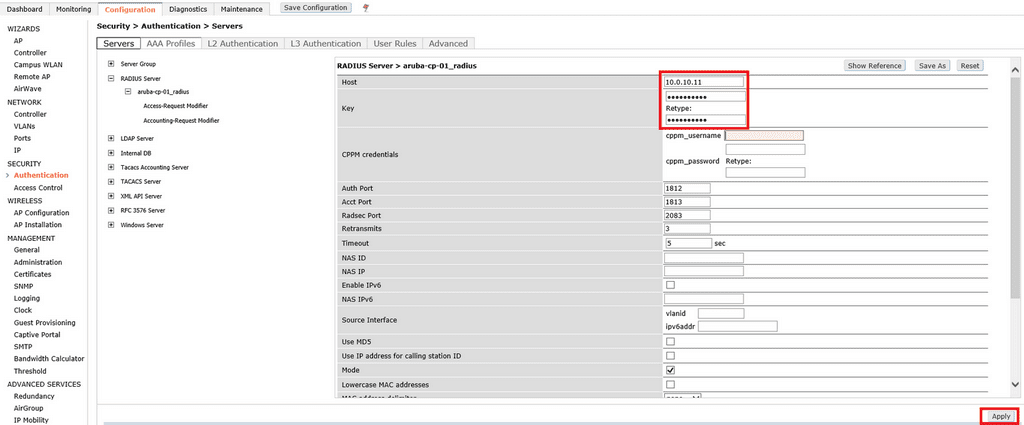
Click Configuration > Security > Authentication > RADIUS Server. In the text box type the name of the ClearPass server and click Add. I like to append _radius to the server name as I also use the same ClearPass server for TACACS authentication requests. You cannot use the same name for multiple server types.

Enter the IP Address and Key. This Key is a shared secret that will also be to configure a controller as a Network Access Device (NAD) on ClearPass. Click Apply.
Get in the habit of creating a Server Group and applying that to your AAA profile. A Server Group allows you to add all of the authentication servers that are available to process a specific type of service. The Aruba Mobility Controllers currently support TACACS, RADIUS, LDAP, and Windows servers (NTLM). If you are using a single ClearPass server for 802.1X authentication, adding it to a server group will allow you to easily add additional servers in the future with no impact to the wireless environment.
To create a Server Group click Configuration > Security > Authentication > Server Group. Type in the name of your Server Group in the text box and click Add.

In the dropdown box within the Server Name column, select the name of the ClearPass (RADIUS) server that you previously created, click Add Server and click Apply. Repeat this step for every ClearPass server (unless your ClearPass servers are clustered and using a VIP).

Next we need to create an RFC 3576 Server. RFC 3576 is an extension to the IETF RADIUS standard that allows authorization changes without having to terminate a user session. While some vendors have the option to toggle this on and off within the RADIUS server settings, Aruba Controllers require you to configure a separate RFC 3576 server.
To create an RFC 3576 Server click Configuration > Security > Authentication > RFC 3576 Server. Type in the IP Address of your ClearPass server into the text box and click Add.
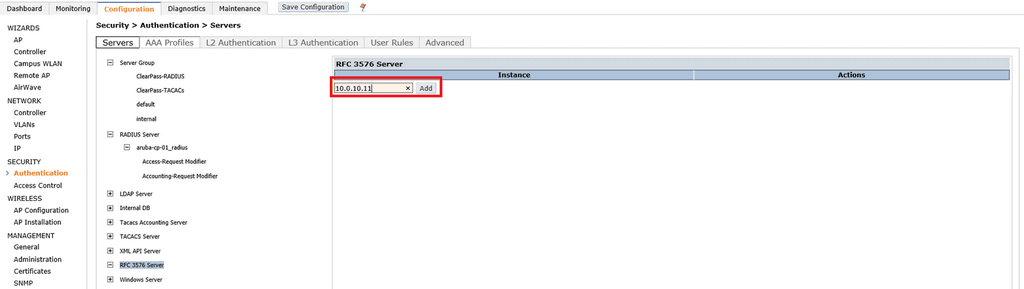
Type and retype the Key. This is the same shared secret that you specified when you created the RADIUS server earlier. Click Apply. Repeat this step for each ClearPass server you have. Although not too common, there are use cases where you may require some servers to perform Change of Authorization (CoA) actions but not process RADIUS requests themselves.
Controller Roles
Roles are containers which can be pre-configured with various settings such as bandwidth contracts, QoS settings and security policies. Assigning a role to a user will automatically apply the configuration to contained within a role to the user session.
In this example, ClearPass will be responsible for determining the appropriate role based on one of two AD Groups the authenticating user is a member of. Using Aruba Vendor-Specific Attributes (VSAs) it will inform the Controller which role is to be assigned to the session. The Controller will apply the following configuration to each role.
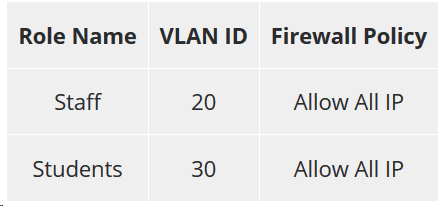
Before you can specify VLAN IDs in your user roles, you need to ensure that the VLANs have been created. The VLAN does not need to be assigned an IP address unless you are doing L3 authentication for captive portal redirection, or any form of routing or NATing.
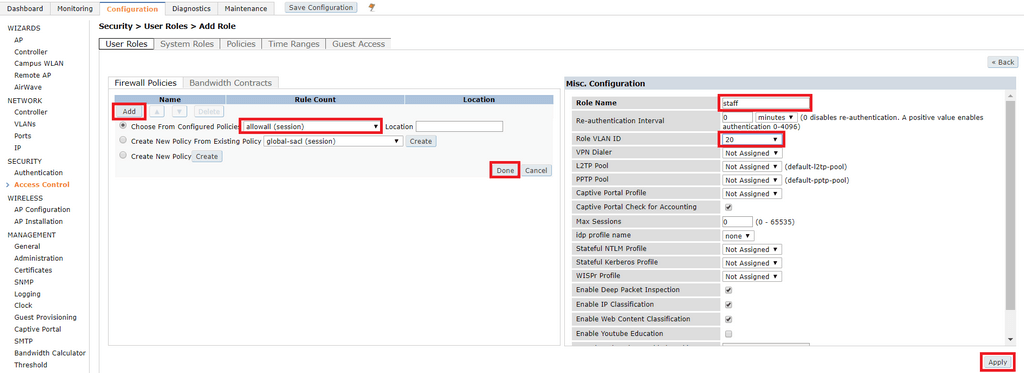
To create a user role click Configuration > Security > Access Control > Add.
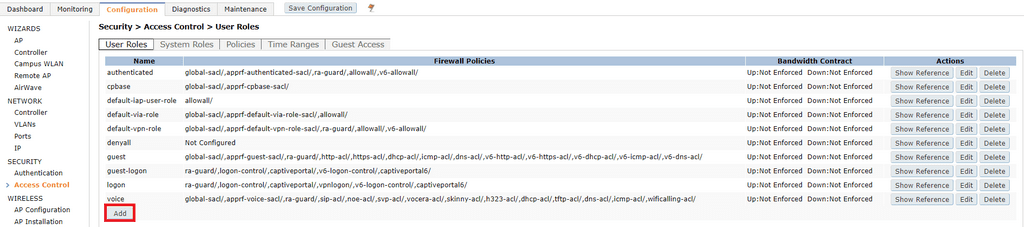
Under the Firewall Policies tab on the left, click Add. From the choose from configured policies drop-down box, select
On the right, specify the role name and Role VLAN ID and click Apply. Repeat for additional user roles.
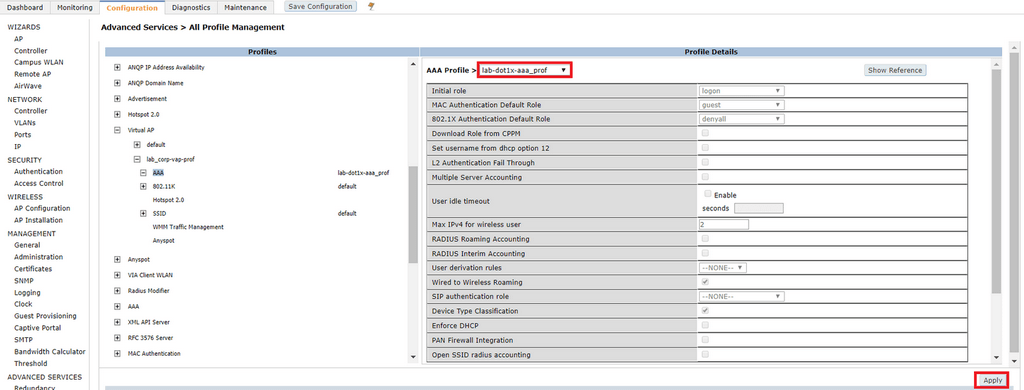
AAA Profile
Next we create a AAA Profile which defines the type of authentication to be used. We will be using 802.1X authentication.
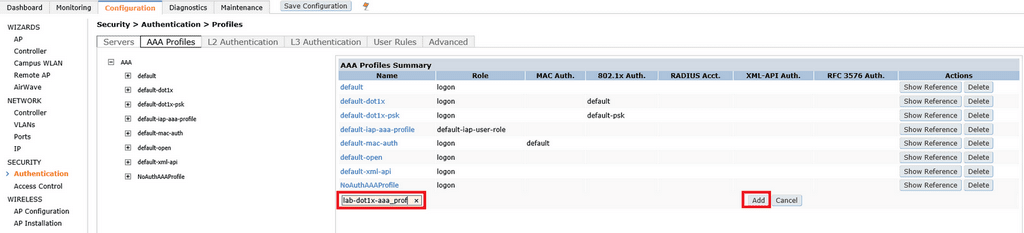
To create a AAA Profile, click Configuration > Security > Authentication > AAA Profiles and click Add.
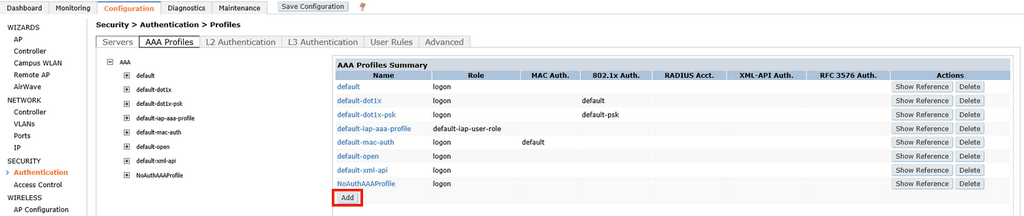
Type in the name of the profile in the text box and click Add.
Click on the name of the profile you just created. When doing 802.1x authentication the initial role does not usually apply. I am not doing MAC authentication so there is no need to change the value here either. In the 802.1X Authentication Default Role drop-down box, I have assigned a role named
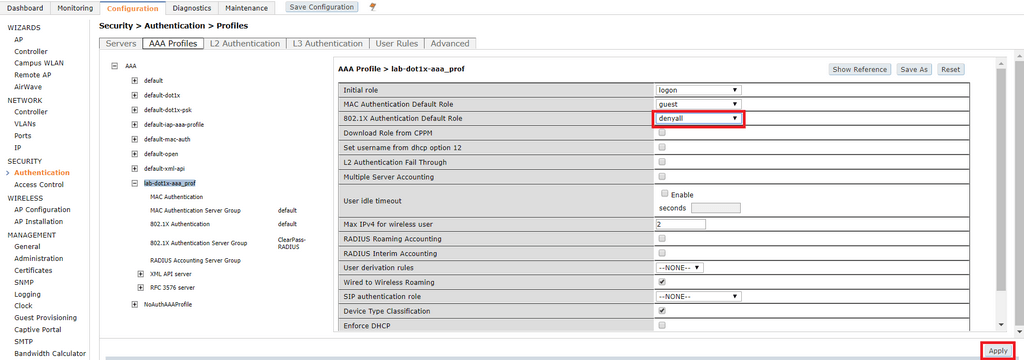
Click on 802.1X Authentication. Under the 802.1X Authentication Profile dropdown box and select default. I am not going to configure machine authentication in this lab so I will not worry too much about these settings. If for any reason you need to terminate the user sessions on the Controller before ClearPass you have the ability to configure that here as well.
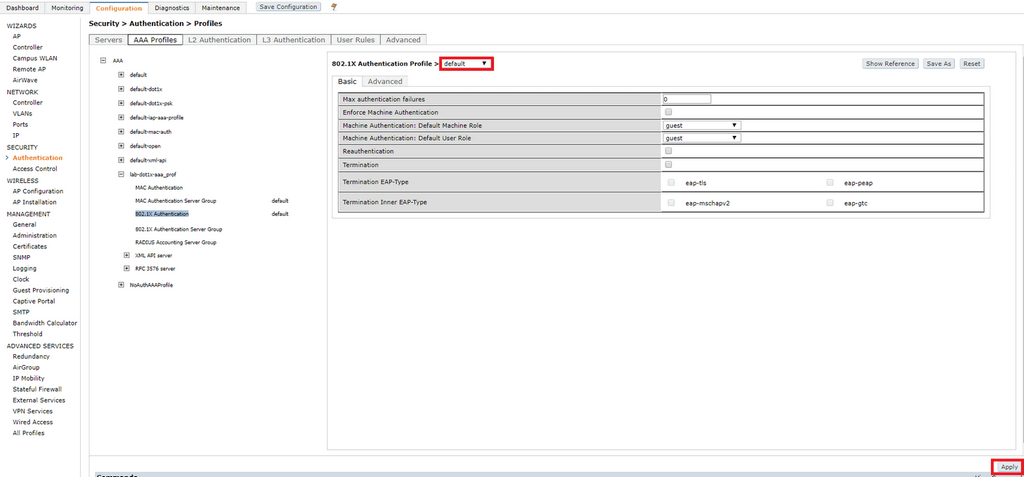
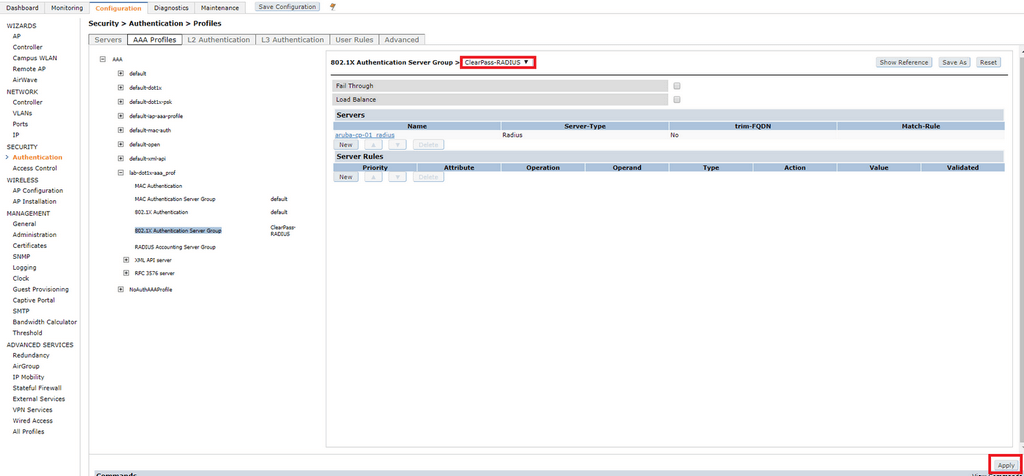
Click on 802.1X Authentication Server Group and select the server group that you created earlier and click Apply.
Virtual AP Profile
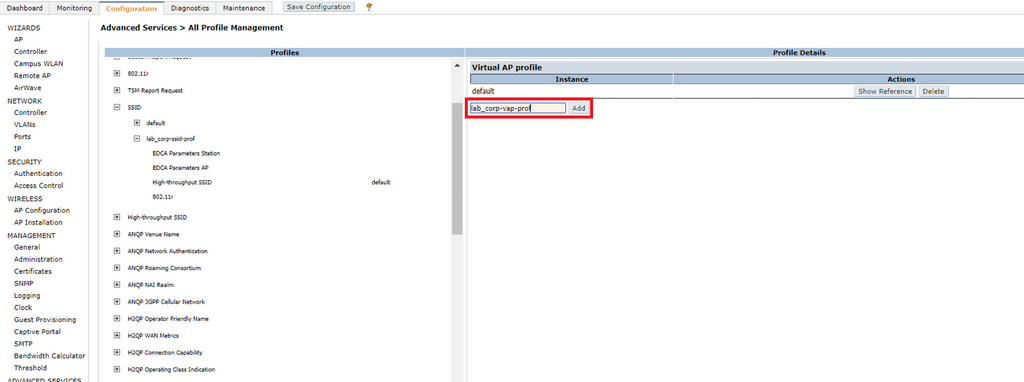
A Virtual AP (VAP) profile groups all of the configuration we have created so far into a unique SSID that can be advertised by one or more APs. To create a VAP, click Configuration > Advanced Services > All Profiles > Wireless LAN > Virtual AP. Type in the name of your new profile and click Add.
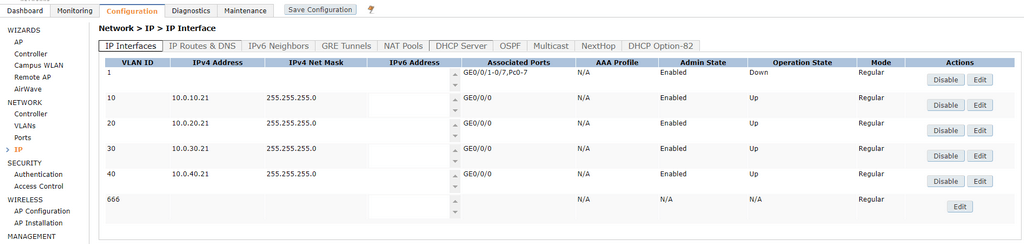
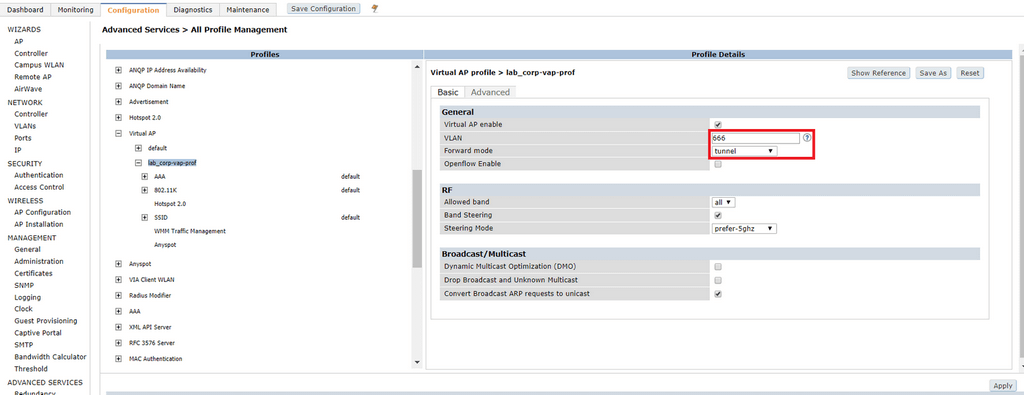
Click on the profile you just created. Type in the default VLAN that users will be placed in to upon authentication. We are using ClearPass to assign user roles which have a VLAN mapping on the Controller, so this shouldn’t come in to affect. In the event that we misconfigure something and allow unauthorised users on to the network, I have specified VLAN 666, a non-routable VLAN. The VLAN you specify here must be configured Configuration > Network > VLANs. Specify the Forward Mode. In this example I am using Tunnel Mode, but if you want clients to be locally switched at the AP, select Bridge. Click Apply.
Select the name of the AAA profile you created earlier under AAA and click Apply.
Select the name of the SSID profile you created earlier under SSID and click Apply.

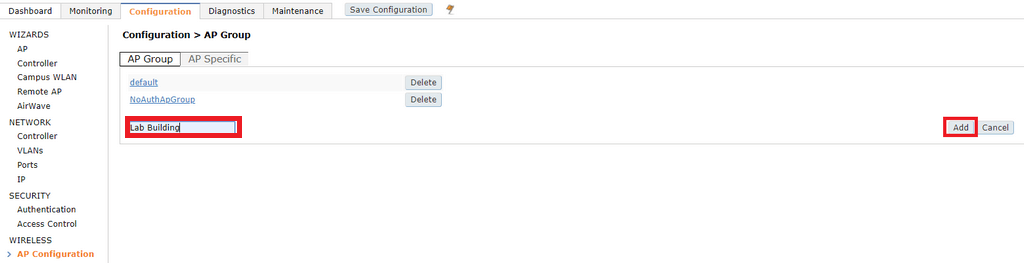
AP Group
An AP group allows us to apply the same WLAN and RF configuration to multiple APs. A common use case is to create an AP group per floor or building and optimise the configuration within that area. To create a new AP group click Configuration > Wireless > AP Configuration. Type in the name of your AP group and click Add.
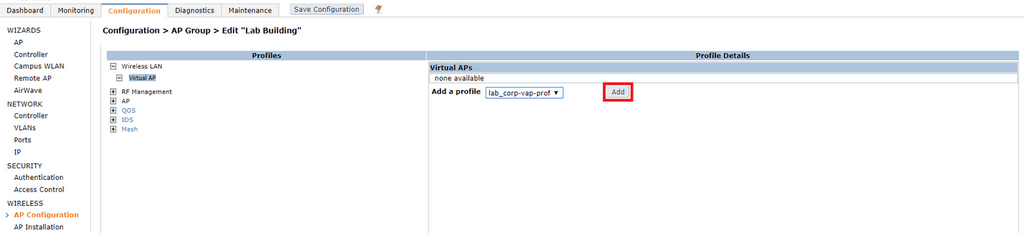
Click on the name of the AP group and click Wireless LAN > Virtual AP. Select the name of the VAP you created in the Add a profile dropdown box and click Add and Apply.
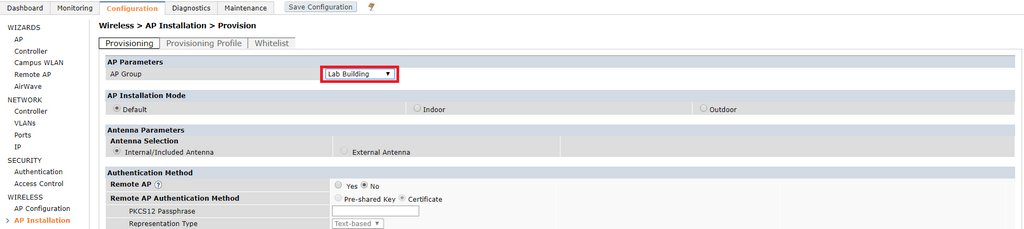
To add an AP to the AP group, click Configuration > Wireless > AP Installation. Tick the AP(s) you want to add to the AP group and click Provision.

Under AP Parameters > AP Group select the dropdown box and click the name of your AP group, click Apply and Reboot and wait for the AP to rejoin the controller.
Navigate to Configuration > Wireless > AP Installation and you should see your AP listed. The AP will be broadcasting your new SSID but you won’t be able to connect to it just yet.
ClearPass Configuration
Domain Join
In order to authenticate users against AD when using PEAP, we first must join ClearPass to an AD domain that the users reside in. This is a one-time procedure which must be performed from an account that has the ability to join a computer to the domain. The account being used for the domain join must have the following permissions:
- Create computer objects
- Delete computer objects
Click Administration > Server Manager > Server Configuration. Click on the server name in the list of servers.
To start the join process, click on Join AD Domain.
Enter the details of your Domain Controller and account credentials and click Save.
If successful you will see the message below.
Click Close and Save.
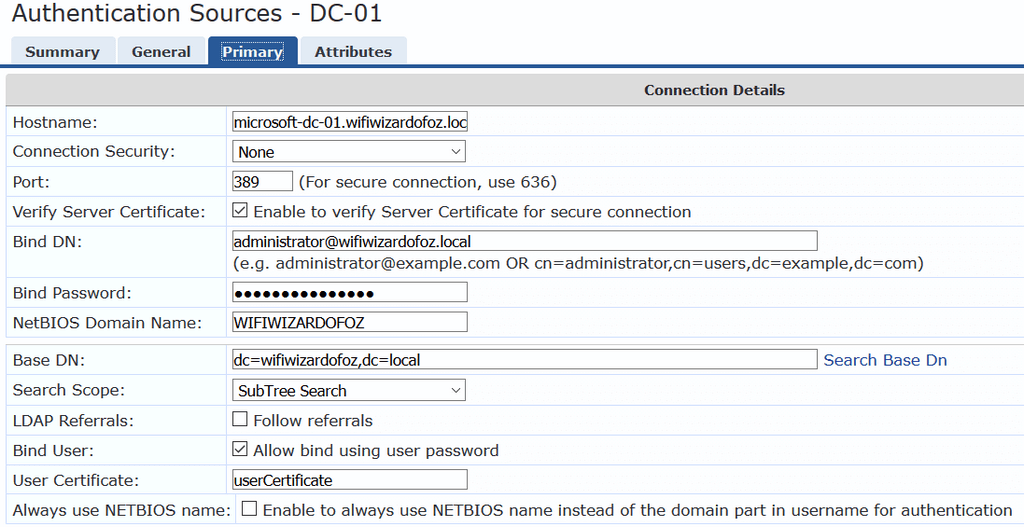
AD as an Authentication Source
To configure AD as an authentication source click Configuration > Authentication > Sources and click Add to create a new authentication source.
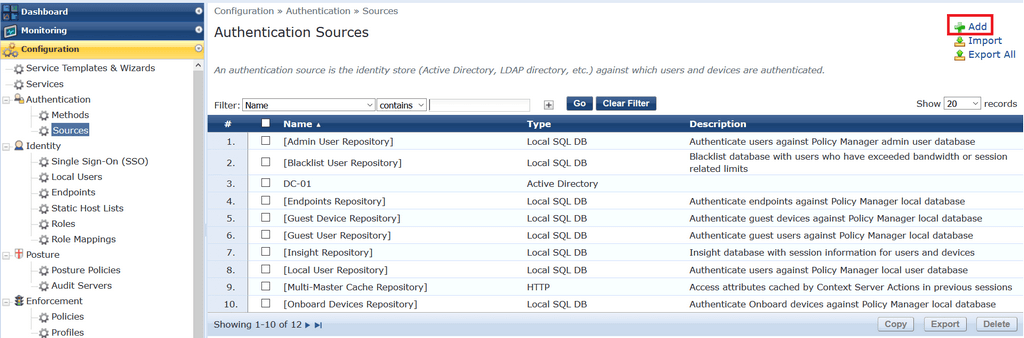
Fill out the the DC hostname, bind DN and password, base DN and any other settings you require and click Save.
AD Users and Groups
When a user authenticates, we want to differentiate whether they are a member of one of two groups, Staff and Student. Here are those groups in AD.
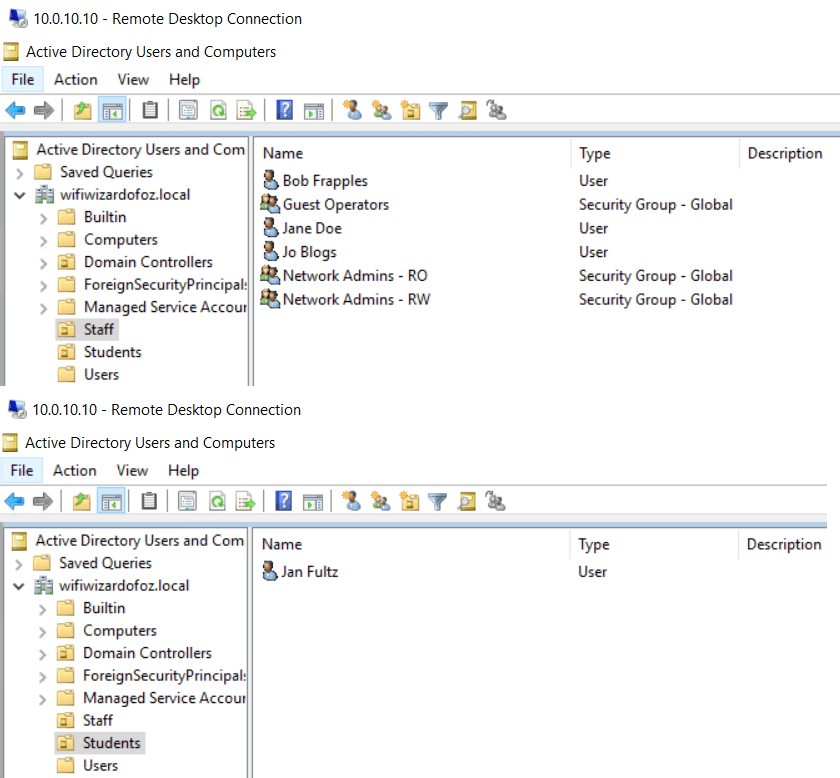
The Staff group has three members as I am using the same configuration I used in one of my previous posts – Authenticate Aruba ClearPass Admins against AD
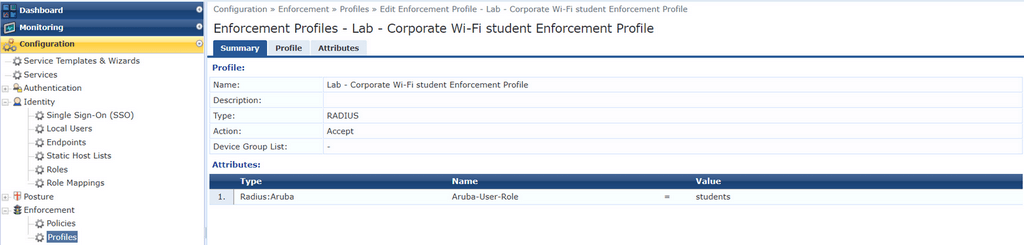
Enforcement Profiles
The roles we created on the Mobility Controller are referenced and applied to user sessions in ClearPass using enforcement profiles. An enforcement profile is the part of ClearPass that is responsible for applying one or more actions based on the conditions that are matched in the enforcement policy. There is a one-to-one mapping of enforcement profiles to controller roles. We will create two user enforcement profiles:
- Lab – Corporate Wi-Fi staff Enforcement Profile
- Lab – Corporate Wi-Fi student Enforcement Profile
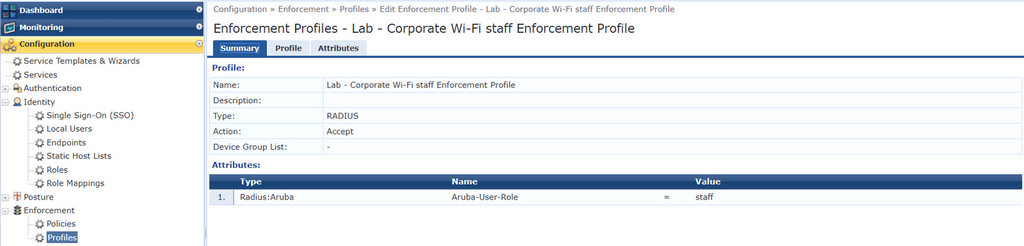
Each profile will enforce the controller role using the ‘Aruba-User-Role‘ attribute. To create an Enforcement Profile click Configuration > Enforcement > Profiles and click Add.

My ‘staff‘ enforcement profile.
And my ‘student‘ enforcement profile.
ClearPass Roles and Role Mapping Policy
A Role Mapping Policy ties together distinguishable authentication attributes to a named role that ClearPass can reference and re-use in enforcement policy decisions. I am going to create two user roles in my mapping policy. Each role will be assigned based on the authenticating AD group.
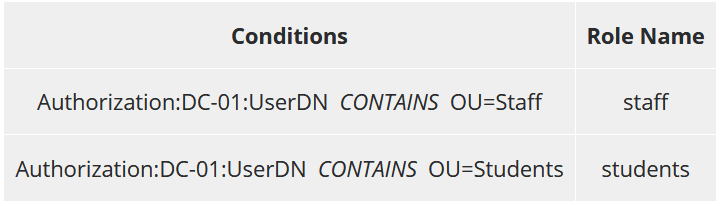
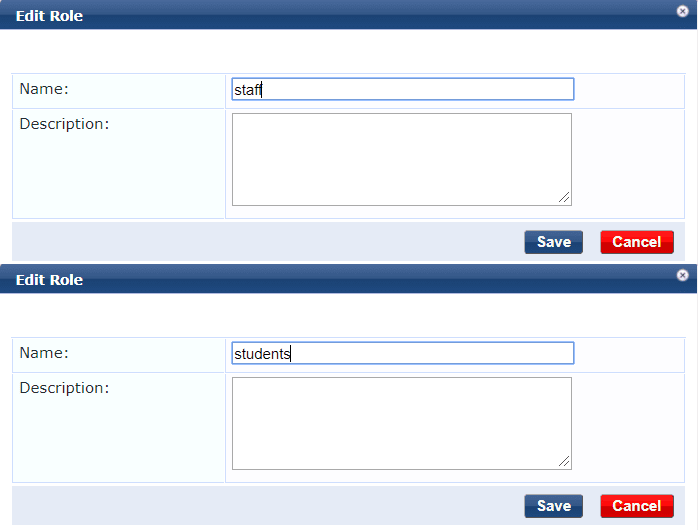
To create a role click on Configuration > Identity > Roles and click Add.

Type in the name of the role and optionally a description. Repeat this step for any additional roles you wish to create.
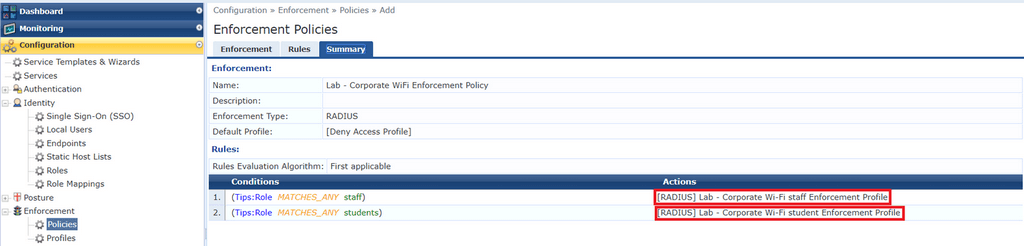
Enforcement Policy
Next, we create an enforcement policy which simply assigns enforcement profiles based on the assigned ClearPass role. TIPS = Trust and Identity Policy System. So ‘Tips
Click on Configuration > Enforcement > Policies and click Add to create your an enforcement policy.

Here is a summary of my enforcement policy. We are simply
Service
It’s time to create a service, which is a means of grouping all of the policy components that serve a specific type of request into a single configuration set. While our service will reference the policies and profiles we created, it also has its own conditions the RADIUS sessions must match before the underlying configuration is processed.
Click Configuration > Service and click Add to create a new service. As there are many options to configure, I am only showing the summary tab for the service.
Things to note –
- In a production environment, you may also require EAP-TLS for certificate authentication. This can be added to/or replace EAP-PEAP.
- In Authentication Sources under the Authentication tab, ensure that AD is the only source in the list.
- Depending on your AD setup, you may also need to tick the Strip Username Rules: checkbox in the Authentication tab
- I have locked down incoming authentication requests to only be accepted from a single NAD IP Address (my Mobility Controller) of 10.0.10.21. If you have multiple Controllers, you could also create a “Device Group” containing all of your devices and reference the group instead of an IP Address.

Verification Testing
Time to test! I used an Android phone to test authentication using the following accounts:
- Bob Frapples (Staff Member)
- Jan Fultz (Student)
Here are the Access Tracker logs (Monitoring > Live Monitoring > Access Tracker) in ClearPass for Bob Frappes. The ClearPass role of staff was applied successfully and the correct Enforcement Profile was applied – so far so good.
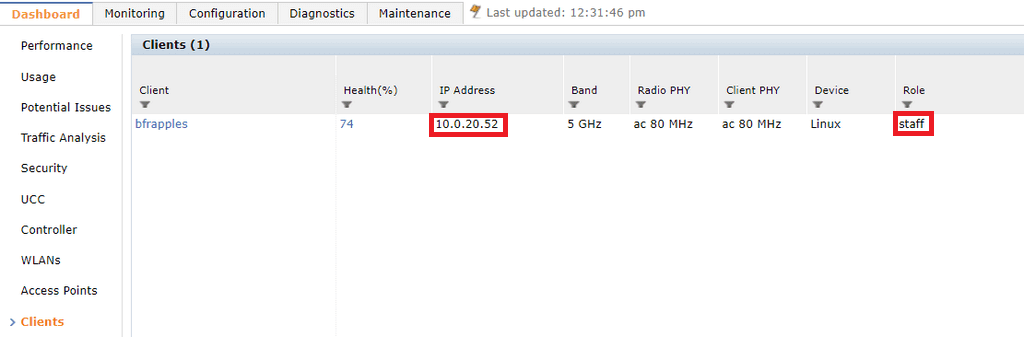
If we head across to the Controller and navigate to Dashboard > Clients, we can see that Bob has been assigned the correct Controller role of staff, and has received IP address within the staff VLAN. Success! You will just have to trust that I could successfully browse the Internet on the test device.
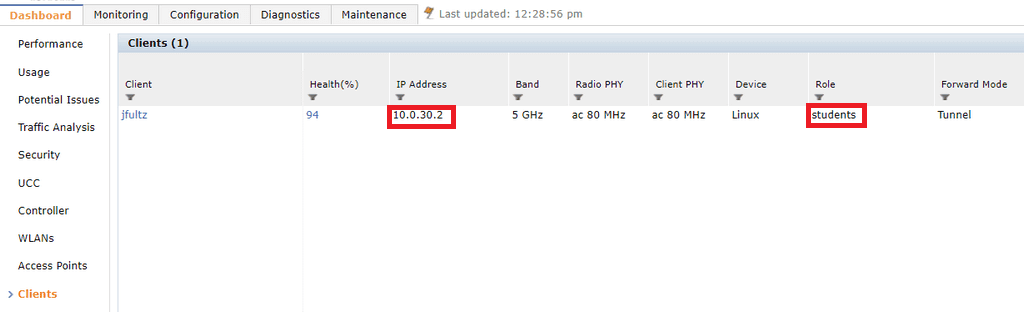
Let’s try the same for Jan Fultz. The ClearPass Access Tracker shows that students role and enforcement profile were applied successfully.
The Controller dashboard tells us that the Controller role of students has also been applied to Jan and she has received an IP address within the correct VLAN.
Congratulations, you have just created and 802.1X WLAN using an Aruba Mobility Controller and Aruba ClearPass!
Thanks a lot sir. Was having lot of trouble trying to connect the pieces together using controller and clearpass and this was the best explanation. God bless you.
Santosh – thanks for the kind words. There is definitely a steep learning curve for some of Aruba products, especially if you are used to other vendor products. In saying that, once you get the hang of it, the ClearPass workflow makes the environment easy to scale and provides a huge amount of flexibility.
Hi Brett Verney,
Thanks for your post, it’s very helpful . You can help me config : Clearpass only allow (domain computers +source user AD) 802.1x service