In this post, I will show you how to deploy a pair of Aruba AOS8 Mobility Conductors in VMware ESXi with a basic setup so you can start adding Mobility Controllers. I used AOS version 8.6.0.15, but the steps should be the same for other 8.x versions.
- Mobility Conductor Virtual Machine Requirements
- Image Verification
- OVA Deployment
- Additional OVA Settings
- Mobility Conductor Setup Wizard
- Licensing
- Adding a Second Mobility Conductor
Mobility Conductor Virtual Machine Requirements
The table below shows the minimum resources required to operate Aruba AOS8 virtual Mobility Conductors on VMware ESXi
| vCPUs | Memory | Disk Space | Total Supported NICs | |
| MCR-VA-50 | 3 | 6GB | 6GB | 3 (2 Data, 1 MGMT) |
| MCR-VA-500 | 6 | 8GB | 8GB | 3 (2 Data, 1 MGMT) |
| MCR-VA-1K | 8 | 32GB | 32GB | 3 (2 Data, 1 MGMT) |
| MCR-VA-5K | 10 | 64GB | 64GB | 3 (2 Data, 1 MGMT) |
| MCR-VA-10K | 16 | 128GB | 128GB | 3 (2 Data, 1 MGMT) |
Image Verification
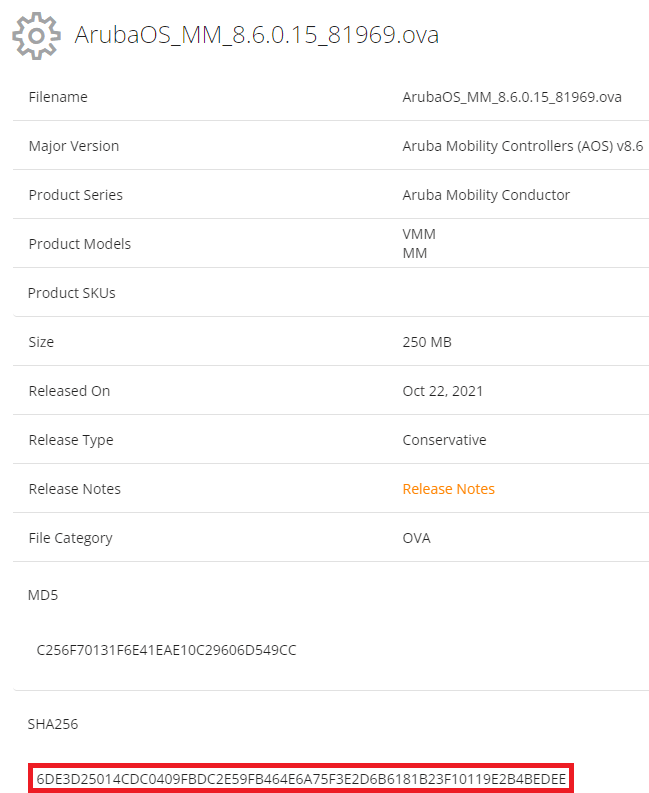
You must verify the MD5 or SHA256 checksum listed on the Aruba Support Portal to ensure it matches the computed checksum of the Mobility Conductor ESXi image you downloaded. Don’t skip this step! There is nothing worse than having to re-download an image because it got corrupted somewhere along the way.
Using the PowerShell command cmdlet Get-FileHash:

It’s a match! If you prefer a GUI option, try WinMD5.
OVA Deployment
I access my ESXi console natively using HTTPS in my lab (no vSphere client).
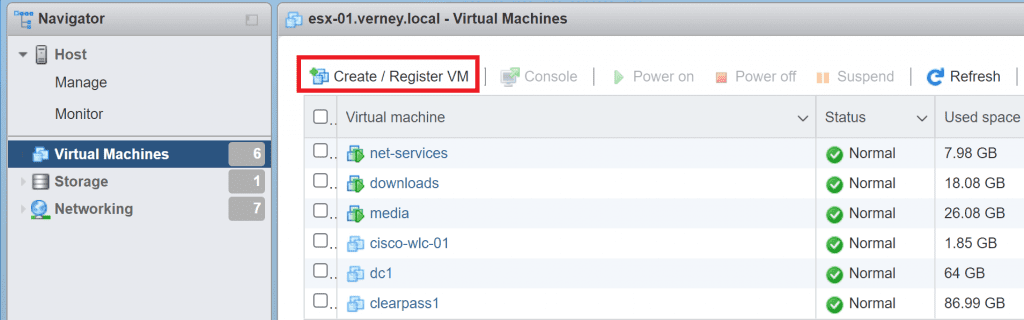
First, we need to register the VM. Click Create / Register VM, and follow the prompts to select the image you downloaded from the Aruba Support Portal (ASP).
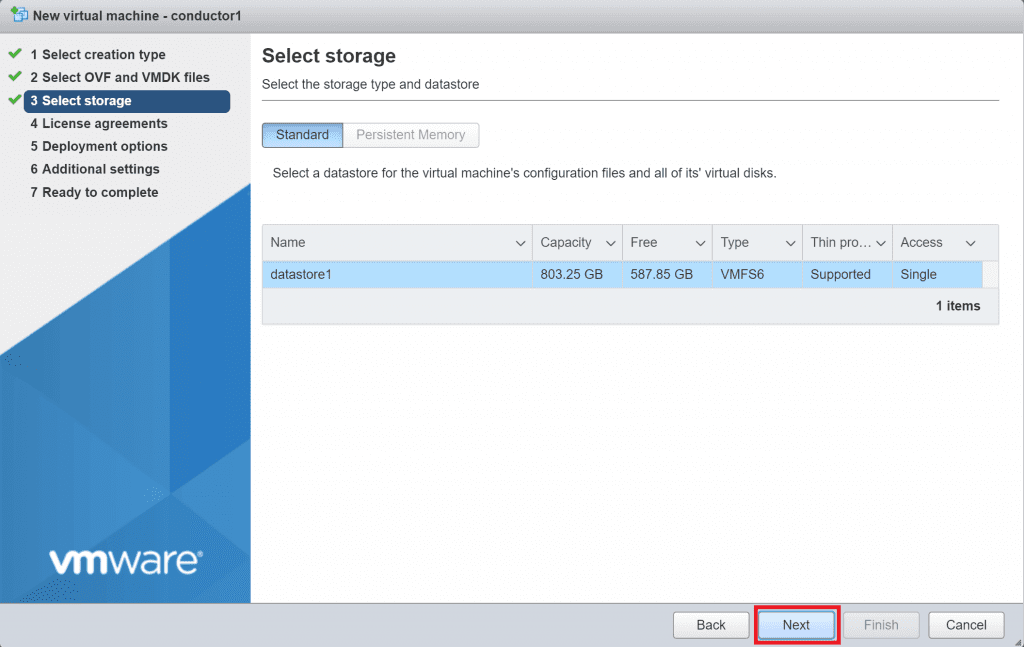
Select the storage where you want to install the VM and click Next.
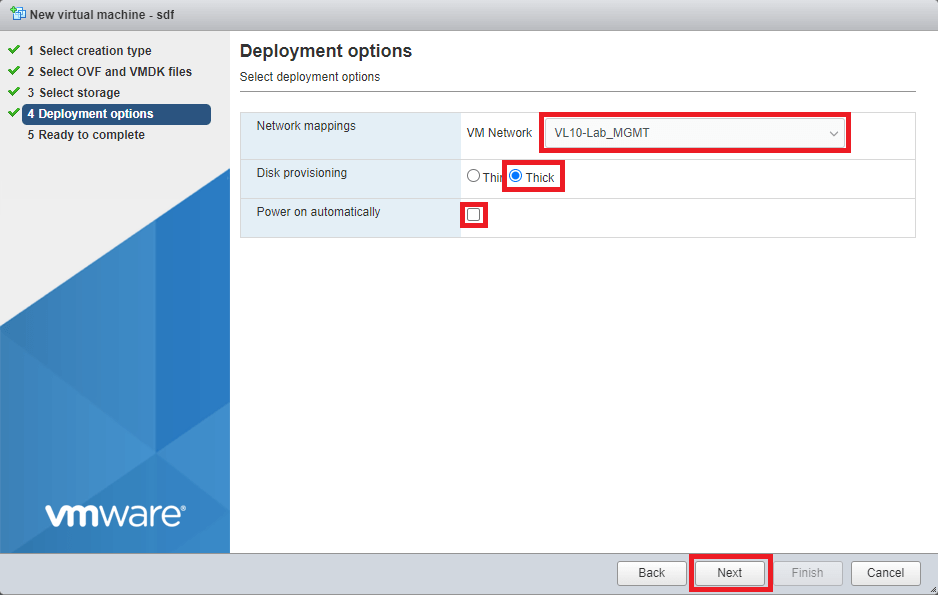
Map your Mobility Conductor NICs to the appropriate VM network. The Aruba guides will tell you to use a VM port group that trunks/allows all VLANs (VLAN ID 4095), but this assumes you want to use the Mobility Conductor’s Out-of-Band (OOB) management interface, which resides in another subnet. I am happy to use the same NIC for management and data functions, so I am mapping the NICs to my server management VLAN.
If you prefer to use the OOB management interface, select a VM port group that specifies VLAN ID 4095. You will have a chance to edit the NICs and their network mappings once the VM is deployed.
Ensure Disk Provisioning is set to Thick. Untick the Power on automatically checkbox as we need to edit the VMs settings before it boots up.
Click Next to continue, then follow the prompts to confirm your setting and finalise the OVA deployment.
Additional VM Settings
Before we power on the VM, there are a number of settings that we need to modify. When the VM has finished deploying, click on the Mobility Conductor hostname in the list of VMs, select the Actions menu and click Edit settings.
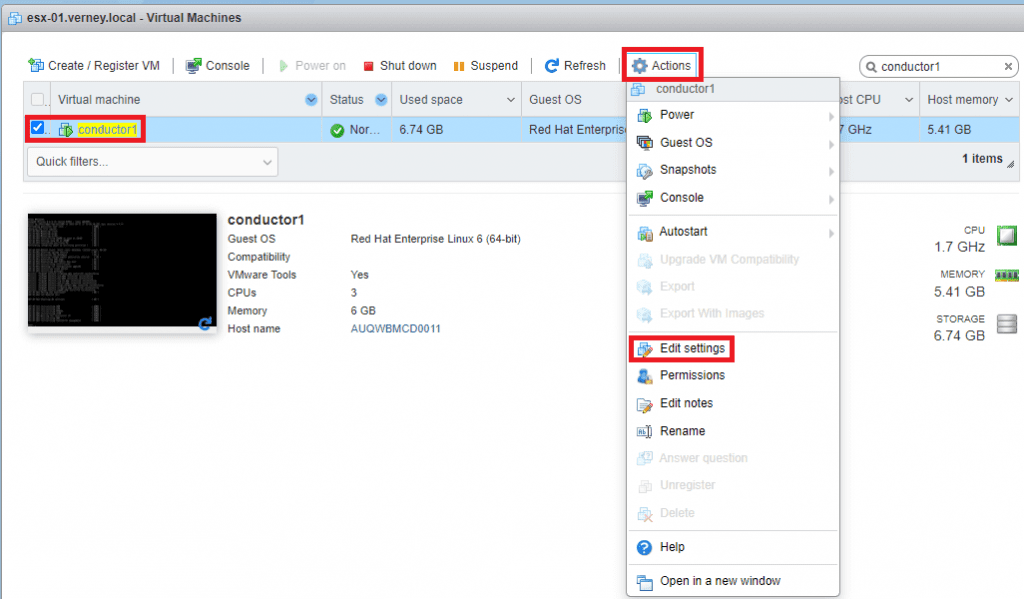
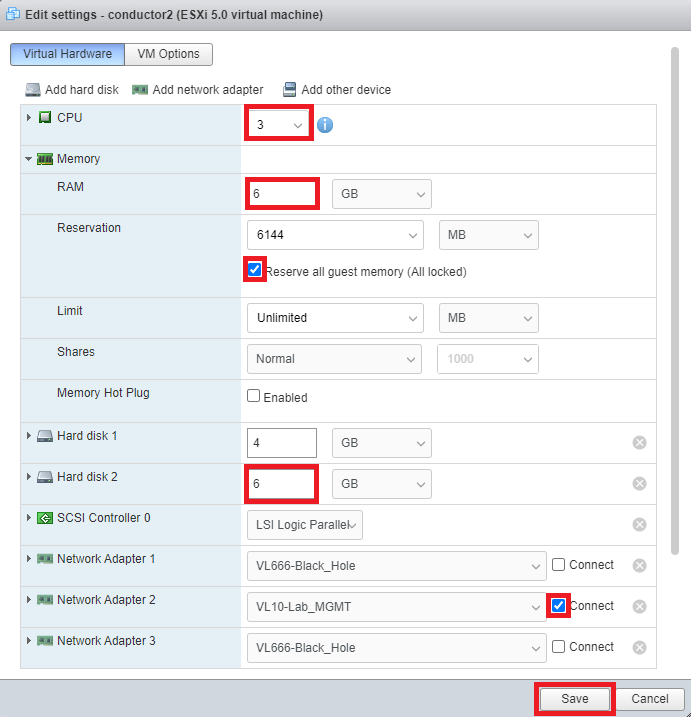
Allocate the required CPU, RAM, and Hard Disk resources per the VM Requirements. Tick Reserve all guest memory (all locked) under the memory settings. Allocate the necessary hard disk space to the Hard disk 2. Hard disk one stores the OS and its base configuration, so don’t modify it.
I only require a single NIC, so have allocated Network Adaptor 2 to my management VLAN. It is best practice to disable any unused NICs and place them in a VLAN that is unrouteable within the LAN in case of any misconfigurations. The three VM NICs correspond to the following Mobility Conductor AOS8 NICs.
- Network Adaptor 1 – Management
- Network Adaptor 2 – Gigabit Ethernet 0/0/0
- Network Adaptor 3 – Gigabit Ethernet 0/0/1
Click Save to continue.
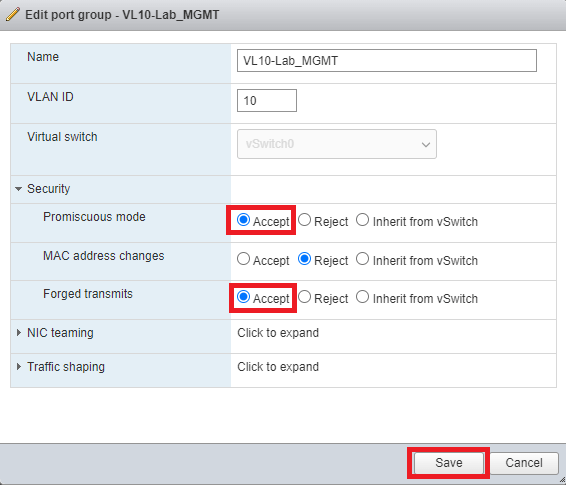
The next step is critical but is often skipped. I have seen it become the root cause of many early deployment issues, so don’t let it happen to you. Find and edit your global vSwitch settings or edit the port group that you used to connect your Mobility Conductor. Expand the Security settings and enable Promiscuous Mode and Forged Transmits. Click Save to continue.
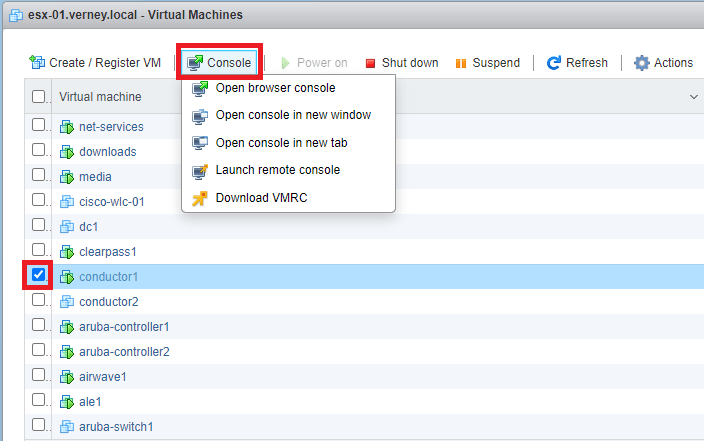
It is time to power on your shiny new toy, so find it in the list of VMs and select Power On.
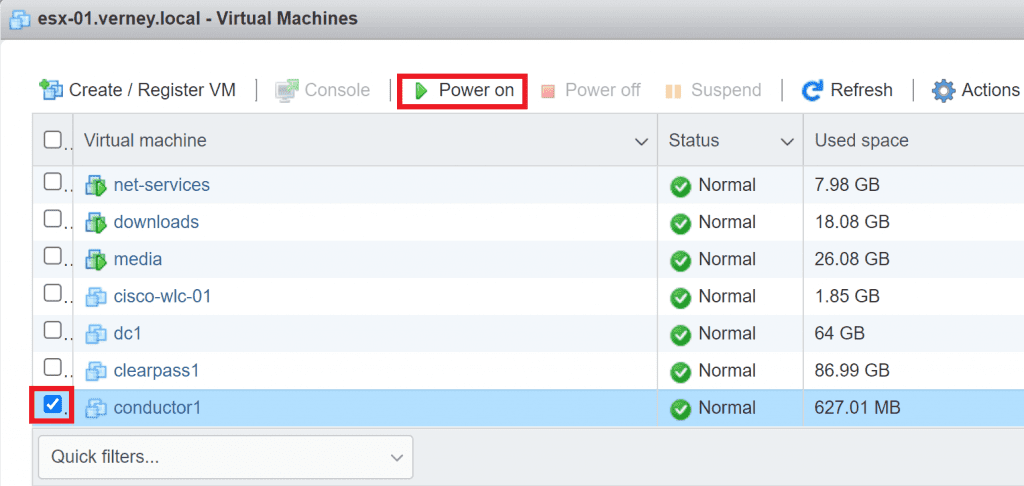
With your VM still selected, click Console and choose one of the available methods to access the VM.
Mobility Conductor Setup Wizard
Once the Mobility Conductor has finished booting, you will be presented with a setup wizard requiring you to enter the following details:
- System Name
- VLAN ID
- VLAN Port
- Port Mode (access/trunk)
- IP and Subnet Details
- DNS Server
- Location, date, and time details
- Local administrator credentials
You will be presented with an option to review and confirm the configuration. When you are happy with your provided details, type in yes to accept the changes.
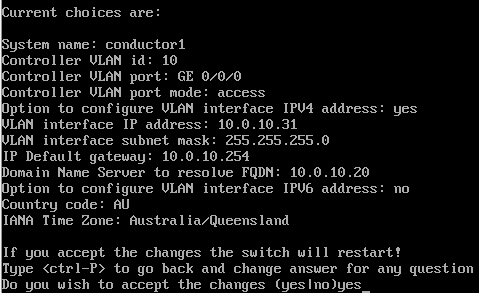
It will take time for the server to apply the changes and reboot, so be patient!
Licensing
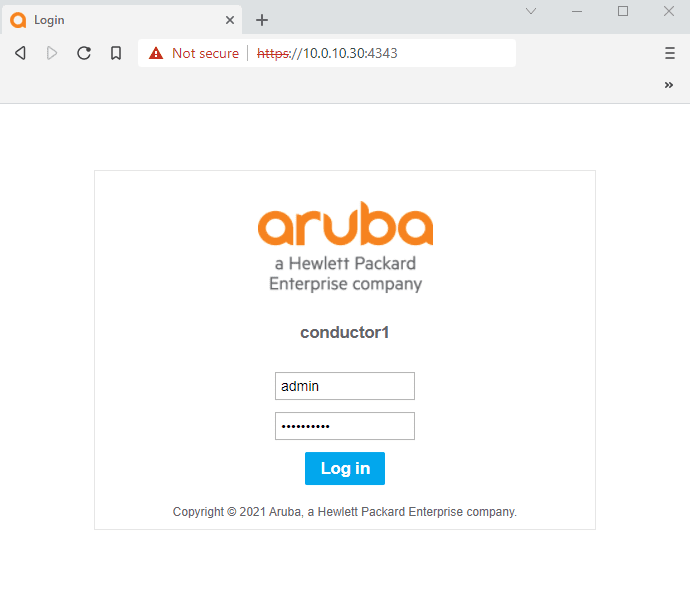
While you can now poke around in the GUI, you won’t be able to do much else if your Mobility Conductor isn’t licensed. When the VM has finished booting up, open a browser and navigate to the IP address and the administrator credentials you assigned in the previous step.
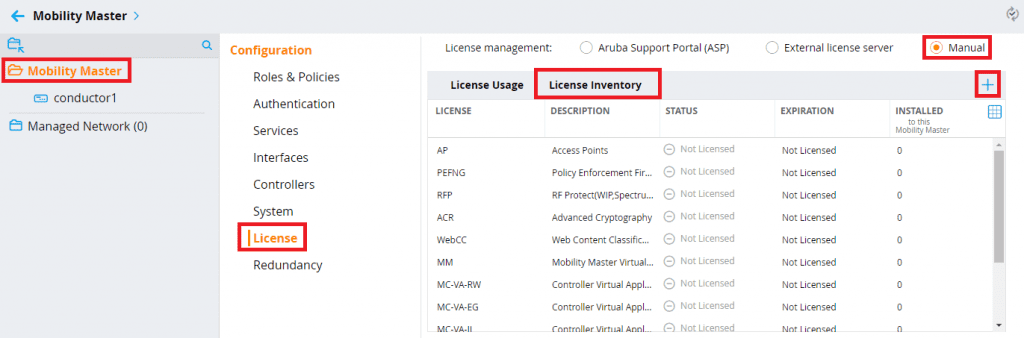
Click on the Mobility Master node (not the name of your Conductor) and select the License menu. I will be applying for licenses manually in my lab, so I will select License Inventory and check the Manual radio button in the License Management section. Then I click the + icon on the top right. Managing licenses via the Aruba Support Portal (ASP) or an external license server is a simple process, but not in the scope of this article.
Copy and paste the license keys that you generated from ASP (or by any other means) into the text box presented to you and click OK.
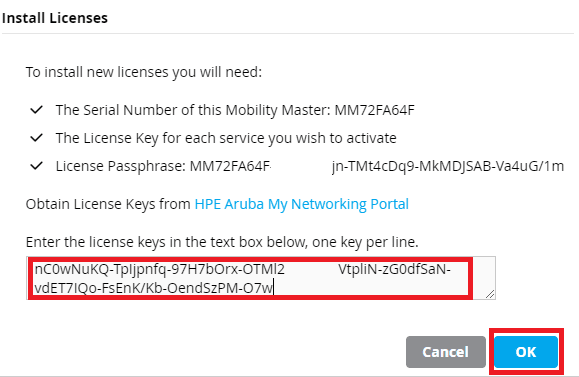
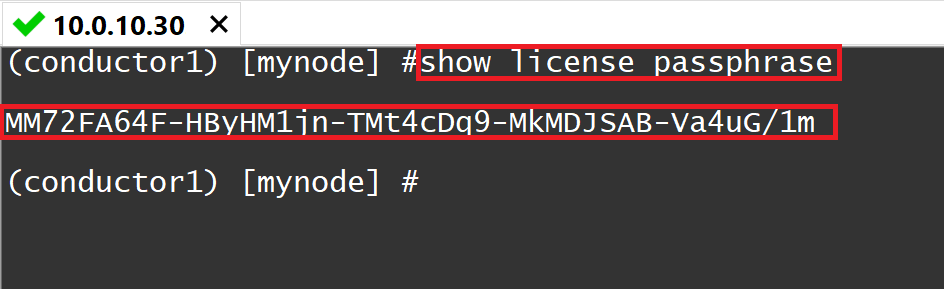
The license passphrase for generating the license key can also be found on this screen if you have not activated your licenses already. Alternatively, you can grab the license passphrase from issuing the command show license passphrase at the Mobility Conductor CLI. While it is possible to run this command from the VM console, you will not be able to copy and paste the passphrase, so it is best to you a terminal emulator such as Putty, SecureCRT etc.
Adding a Second Mobility Conductor
Repeat the steps until the licensing section to add a second Mobility Conductor.
That’s it! In my next post, I will show you how to cluster the two appliances so that you can provide High Availability for all of the features that Aruba Mobility Conductors introduce. While technically, you can now start adding Mobility Controllers to your environment, the second Mobility Conductor is provided at no extra cost. So unless you are deploying a single appliance for lab purposes, there is no excuse not to add a second!
Thank you for your sharing. It is a good post and useful 🙂